
Irresistible Raspberry Cheesecake Thumbprint Cookies for Dessert Lovers
Why You’ll Love This Recipe
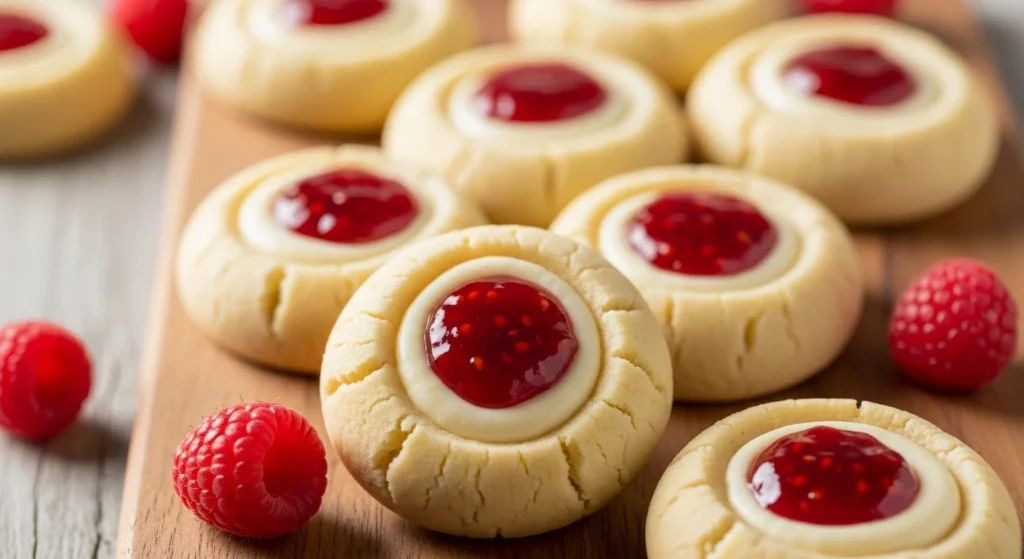
If you’re a fan of fruity desserts, creamy cheesecake, or buttery cookies (or all three!), these Raspberry Cheesecake Thumbprint Cookies will absolutely steal your heart. They’re not just pretty to look at—they combine the richness of cheesecake with the brightness of raspberry jam in a soft, tender cookie base.
Why are they such a hit? Well…
- They taste like mini cheesecakes with a hint of jammy sweetness and a melt-in-your-mouth cookie shell.
- Fast and simple—you only need about 20 minutes of prep before they go in the oven.
- Perfect for any occasion: holiday cookie swaps, brunch, afternoon tea, or just a cozy night in.
- You can customize them! Try strawberry, blueberry, or even lemon curd if raspberries aren’t your jam (pun intended).
Isn’t it the best when you can make bakery-worthy treats at home—without a ton of effort?
Essential Tools and Equipment
Here’s what you’ll need to make these scrumptious thumbprint cookies:
- Mixing bowls – one large for dough, one medium for filling.
- Hand mixer or stand mixer – to cream the butter and sugar until fluffy.
- Rubber spatula – great for scraping down sides and folding ingredients.
- Measuring cups and spoons – accuracy counts in baking!
- Baking sheets – lined with parchment or silicone baking mats.
- Small spoon or melon baller – for making the “thumbprint.”
- Cooling rack – so cookies cool properly without getting soggy bottoms.
Optional but helpful: a piping bag or zip-top bag with the corner snipped for neater filling.
Preparation Tips
Want flawless results without the fuss? These tips will help you bake like a pro:
- Butter at room temperature is key. Cold butter won’t cream well. Let it sit out for 30–60 minutes first.
- Chill the dough if needed. If your kitchen’s warm and the dough is soft, pop it in the fridge for 15–20 minutes to make it easier to handle.
- Use a measuring spoon (about ½ teaspoon) to gently press the “thumbprint” in the center. This ensures even filling and baking.
- Preheat your oven early so it’s hot and ready when your cookies are.
Do-ahead bonus: You can make the cookie dough a day in advance and store it in the fridge, or even freeze it for later!
Ingredients List
Here’s everything you’ll need for these delicious bites of joy:
For the cookie dough:
- 1 cup (2 sticks) unsalted butter, at room temperature
- ⅔ cup granulated sugar
- 2 large egg yolks
- 1 teaspoon vanilla extract
- 2⅓ cups all-purpose flour
- ¼ teaspoon salt
For the cheesecake filling:
- 4 oz cream cheese, softened
- 3 tablespoons granulated sugar
- ½ teaspoon lemon juice (optional—but enhances flavor)
For the topping:
- ⅓ cup raspberry jam or preserves (seedless preferred)
Feel free to swap the raspberry jam for other fruit preserves like apricot, cherry, or blueberry.
Step-by-Step Directions
Ready to dive in? Let’s do this!
- Preheat your oven to 350°F (175°C). Line two baking trays with parchment paper.
- Cream the butter and sugar in a large bowl using a hand mixer or stand mixer on medium speed, until light and fluffy—about 2–3 minutes.
- Add egg yolks and vanilla extract. Beat until incorporated.
- In a separate bowl, whisk together the flour and salt. Gradually add to the butter mixture, beating on low speed just until combined. Don’t overmix!
- Scoop out dough—about 1 tablespoon per cookie—and roll into balls. Place them 2 inches apart on prepared trays.
- Make impressions: Use your thumb, the back of a teaspoon, or a melon baller to press a small dent into the center of each ball. Be gentle so the cookie doesn’t crack too much.
- Mix the cheesecake filling: In a small bowl, beat cream cheese, sugar, and lemon juice until smooth and creamy.
- Fill each indentation with a tiny spoonful of cheesecake filling (about ½ teaspoon).
- Add jam: Top each dollop of cheesecake with about ¼ teaspoon of raspberry jam. Don’t overfill—it will spread a little during baking.
- Bake for 12–14 minutes, or until cookies look set and edges are just barely golden.
- Cool completely on the baking sheet for 5 minutes before transferring to a wire rack to cool completely.
Enjoy them once cooled… if you can wait that long!
Common Mistakes to Avoid
Baking cookies should be fun—not frustrating. Here are a few missteps to steer clear of:
- Using cold butter – this makes the dough stiff and hard to blend. Room temperature ingredients give better texture.
- Overmixing the dough after adding flour. It can make the cookies tough instead of tender.
- Overfilling with jam – too much filling spills out and creates a mess. Stick to small spoonfuls.
- Skipping the cooling period – moving cookies too soon can cause them to break. Be patient!
Best Side Dishes
While these cookies are a standalone dessert hit, they pair beautifully with:
- Afternoon tea: Serve alongside earl grey, chamomile, or fruit-based teas for a relaxing treat.
- Fresh berries and whipped cream: Add a refreshing twist with a mini dessert plate.
- Vanilla ice cream or frozen yogurt: The cold and creamy contrast is pure bliss.
- Coffee or espresso: The richness of the cookie complements bitter brews perfectly.
Expert Recipe Tips
Want to bake like a pastry chef? Try these bonus tips:
- Chill the dough for 20 minutes if it feels sticky or you want rounder cookie shapes.
- Use a zip-top bag with the corner snipped to pipe the cheesecake filling neatly into the cookies.
- Try flavored cream cheese (like honey or lemon) for fun flavor twists.
- Dust with powdered sugar once they’re cool for a dreamy, frosted finish.
Storage and Reheating Instructions
Not eating them all at once? (Good self-control!)
- Store in an airtight container in the fridge for up to 4 days. Because of the cream cheese, refrigerating is a must.
- Freeze for up to 2 months. Layer cookies with parchment in a freezer-safe container. Thaw in the fridge overnight before serving.
- To reheat: Let come to room temperature or warm gently in the microwave for 10 seconds. Avoid overheating or the cream cheese filling may weep.
Frequently Asked Questions (FAQs)
Can I use different jam flavors?
Absolutely! Try strawberry, apricot, cherry, or even lemon curd. Whatever fruit flavor you love works here.
Do I have to chill the cookie dough?
Not always, but if the dough is too soft to handle or sticky, a short chill makes it easier to shape and less likely to spread.
Can I make these ahead of time?
Yes! You can make the dough 1–2 days ahead or freeze unbaked cookie balls for future baking. Just fill and bake straight from the fridge or freezer (add 1–2 extra minutes bake time).
Is there a gluten-free alternative?
Yes—use a cup-for-cup gluten-free flour blend. Cookie texture may vary slightly, but they’ll still be delicious.
What should I do if my cookies crack?
Minor cracks are fine (they add rustic charm!). If cracks are deep, the dough may be too cold or dry. Let it warm slightly or mix in 1–2 tsp milk.
Final Thoughts
There’s something magical about the combo of creamy cheesecake and sweet raspberry nestled inside a golden cookie. These Raspberry Cheesecake Thumbprint Cookies are crowd-pleasers, festive favorites, and simple enough to make on a whim.
Next time you’re craving something sweet, give this recipe a whirl. Your kitchen will smell amazing, and your taste buds will thank you.
Have you tried this recipe? Tell us how it turned out in the comments—and don’t forget to snap a pic and share it on social media. Happy baking! 🍪
Looking for more treats? Try our easy Strawberry Shortbread Bars or decadent Chocolate Chip Cheesecake Brownies!