
Decadent Chocolate Caramel Cheesecake Bites for Easy Desserts
Why You’ll Love This Recipe
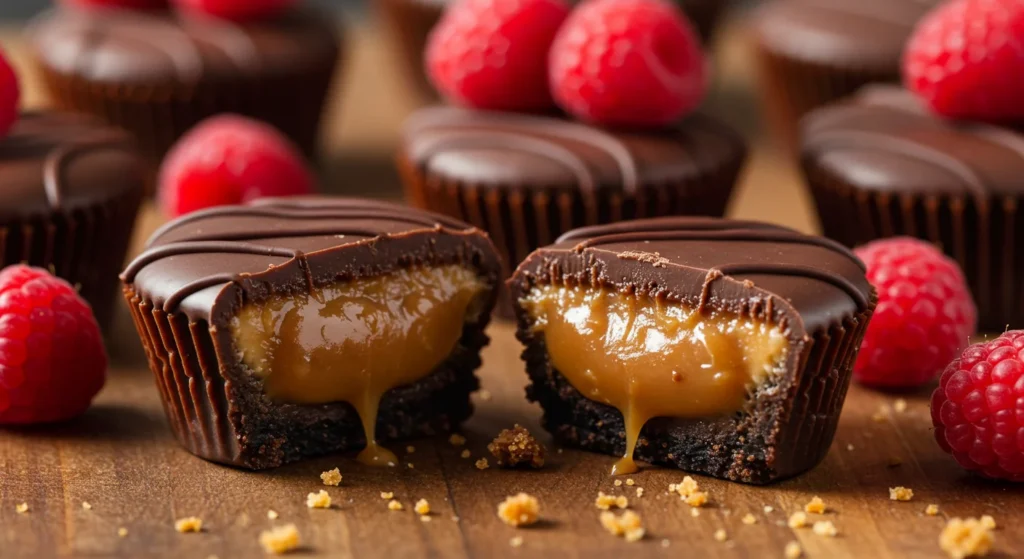
If you’re a dessert lover with a soft spot for rich, creamy treats, these Chocolate Caramel Cheesecake Bites will sweep you off your feet. They’re the ideal combination of smooth cheesecake, luscious caramel, and indulgent chocolate—all packed into perfectly poppable bite-sized portions.
Here’s why these cheesecake bites are an instant favorite:
- Quick Prep: You won’t need hours in the kitchen. Simple steps make them weeknight-friendly.
- No Fork Needed: These mini desserts are easy to serve at parties and potlucks—no plates required!
- Freezer-Friendly: Make a batch ahead and freeze for when your sweet tooth strikes.
- Decadent Flavor: That triple blend—velvety cheesecake, chewy caramel, rich chocolate—is out of this world.
- Adaptable: Use milk or dark chocolate, add nuts, or drizzle extra toppings to suit your mood.
Trust me, one bite and you’ll understand why these redefine the word “irresistible.”
Essential Tools and Equipment
To make these bite-sized delights, you won’t need fancy gadgets—just a few kitchen staples:
- Mini muffin tin – for creating bite-sized portions
- Mixing bowls – 1 large and 1 medium
- Electric mixer or hand whisk – for smooth cheesecake filling
- Rubber spatula – to scrape the bowl clean
- Small saucepan – for melting caramel
- Microwave-safe bowl or double boiler – for melting chocolate topping
- Cooling rack – to help the cheesecake bites set up properly
- Mini cupcake liners (optional) – for easy removal and a nicer presentation
Preparation Tips
Nail every bite with these simple tips:
- Room Temperature Ingredients: Let cream cheese and eggs come to room temperature for a smoother, lump-free batter.
- Line Your Muffin Pan: Use mini cupcake liners to make un-molding effortless. Plus, cleanup is a breeze.
- Do-Ahead Tip: You can make these a day or two in advance. In fact, they taste even better after resting in the fridge a bit!
- Chill Before Topping: Let the baked cheesecakes cool completely before adding caramel and chocolate layers. This prevents melting or slipping.
- Use a Cookie Scoop: To distribute batter evenly and avoid messy fingers.
Ingredients List
Here’s everything you’ll need to bring your Chocolate Caramel Cheesecake Bites to life:
- 20 Oreo cookies, finely crushed (for crust)
- 2 tbsp melted butter (unsalted)
- 2 (8 oz) packages cream cheese, softened
- ½ cup granulated sugar
- 1 tsp vanilla extract
- 2 large eggs, at room temperature
- 15 soft caramel candies (or about ¾ cup caramel bits)
- 2 tbsp heavy cream (for caramel sauce)
- 1½ cups semi-sweet or dark chocolate chips
- 1 tbsp coconut oil or shortening (for chocolate topping – optional, helps with smoothness)
- Sea salt (optional) – for sprinkling on top
Step-by-Step Directions
Follow these steps and you’ll have bakery-style bites with minimal effort!
- Preheat your oven to 325°F (163°C) and line a mini muffin tin with cupcake liners.
- Make the crust: In a bowl, combine the crushed Oreos and melted butter. Mix until the texture resembles wet sand.
- Press about **1 teaspoon** of this mixture into the bottom of each liner. Use the back of a spoon or your thumb to pack it firmly.
- Bake the crusts for 5 minutes. Remove and let cool slightly.
- Prepare the cheesecake filling: In a mixing bowl, beat the cream cheese, sugar, and vanilla until smooth and creamy.
- Add eggs one at a time, mixing just until incorporated. Don’t overbeat!
- Spoon the cheesecake mixture over the crusts, filling each cupcake liner about ¾ full.
- Bake for 15–18 minutes, or until the centers are slightly jiggly but edges are set.
- Cool: Let cheesecakes cool in the pan for 15 minutes, then transfer to a wire rack. Chill in the fridge for at least 2 hours.
- Melt the caramel: In a small saucepan, gently heat the caramels with heavy cream over low heat. Stir constantly until smooth.
- Spoon a small amount of caramel over each chilled cheesecake bite. Return to fridge for 15 minutes to set.
- Melt the chocolate: In a microwave-safe bowl, melt chocolate chips and coconut oil in 30-second intervals, stirring until smooth.
- Drizzle or spoon chocolate over the caramel. Top with a sprinkle of sea salt if desired.
- Chill again until the chocolate is set—about 30 minutes.
- Serve & enjoy! Or store in the fridge or freezer for later (more on that below).
Common Mistakes to Avoid
Even with a straightforward recipe like this, a few slip-ups can sneak in. Here’s what to watch out for:
- Overmixing the batter: This can lead to air bubbles and cracked tops. Mix until smooth, but not more than needed.
- Not chilling long enough: If you rush the cooling, the layers may slide. Let your bites chill completely before adding toppings.
- Filling liners too full: Leave space for the caramel and chocolate toppings. Stick to ¾ full per liner.
- Using cold cream cheese: This causes lumps in the batter. Give it time to soften at room temp before you start.
Best Side Dishes
While these cheesecake bites are quite the showstopper on their own, a good pairing can turn dessert into a celebration. Try these side dishes for the full experience:
- Fresh fruit: Strawberries or raspberries offer a juicy contrast to the richness.
- Espresso or coffee drinks: Coffee brings out the chocolate notes—perfect after dinner!
- Mint tea or herbal infusions: They add freshness and cleanse the palate.
- Vanilla whipped cream: Light and fluffy, it’s a gentle flavor match that adds elegance.
Expert Recipe Tips
Want to add a pro-chef touch? These tips elevate your baking game:
- Add crunch: Sprinkle chopped toasted pecans or graham crackers over the melted chocolate.
- Dairy-free swap: Try dairy-free cream cheese and vegan chocolate chips. Use coconut milk instead of heavy cream.
- Flavor twist: Add ½ teaspoon espresso powder to the chocolate layer for mocha caramel cheesecake bites.
- Use silicone pans: They make removing chilled bites much easier (bonus: they’re reusable!).
Storage and Reheating Instructions
One of the many perks of this recipe? How well they store!
- Refrigerator: Store in an airtight container for up to 5 days. Keep them chilled until just before serving.
- Freezer: Freeze bites in a single layer first, then transfer to a container or zip bag. They keep well for up to 2 months.
- Thawing: For best taste, thaw in the fridge overnight before serving. Or eat them semi-frozen for an ice cream-like texture.
- Reheating: These are meant to be served chilled, so no baking or warming needed!
Frequently Asked Questions (FAQs)
Can I use a full-size muffin tin instead of mini?
Yes! Just adjust the baking time to closer to 22–25 minutes. Keep an eye on the center for doneness.
What if I don’t have caramel candies?
No problem. You can use a store-bought caramel sauce or make a quick one using sugar, butter, and cream.
Can I make them gluten-free?
Absolutely. Use gluten-free sandwich cookies for the crust to make the entire dessert gluten-free.
Do I need to use a water bath?
Nope! Because we’re baking small portions, they cook evenly without needing a water bath. Another reason to love this recipe.
Can I double the recipe?
Yes! These freeze beautifully and are always a hit at gatherings—making more is never a bad idea.
Final Thoughts
There’s something magical about mini desserts, and these Chocolate Caramel Cheesecake Bites prove why. They’re indulgent yet simple, elegant yet easy enough for a weekday treat.
Whether you’re making them for holiday gatherings, birthday parties, or just a personal dessert stash (no judgment here!), they bring a little bliss to every bite.
Have you tried them yet? Drop a comment below—let us know how yours turned out. And if you snapped some photos, we’d love for you to share them. Happy baking!
—
Looking for more mini dessert inspiration? Check out our Mini Lemon Cheesecake Tarts or these delightful No-Bake Cookie Dough Bites for more sweet ideas that wow without the stress.