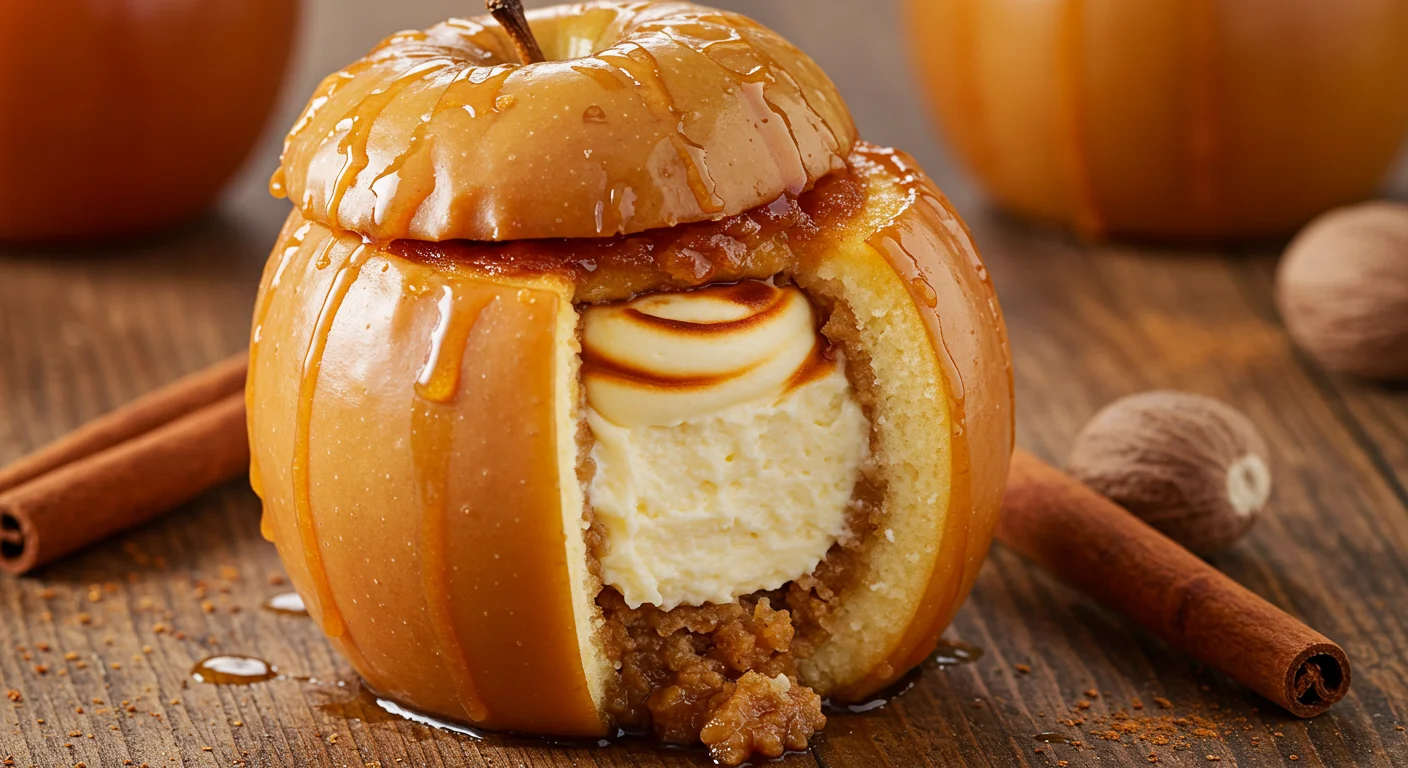
Cheesecake Stuffed Baked Apples Perfect for Fall Desserts

Why You’ll Love This Recipe
Imagine the cozy aroma of baked apples filling your kitchen, the creamy richness of cheesecake oozing from the center, and a warm, spiced flavor that tastes like autumn in every bite. That’s what these Cheesecake Stuffed Baked Apples deliver—and so much more!
This recipe is a game-changer for anyone who wants a delicious fall dessert without the fuss of crusts or complicated steps. Whether you’re hosting Thanksgiving dinner or just craving something sweet for a chilly night, this dessert nails it every time.
Here’s why you’ll fall in love with it:
- Quick & Easy: A few simple steps and minimal prep time.
- Comfort Food Classic: Combines two favorites—cheesecake and baked apples.
- Make-Ahead Friendly: Prep it earlier and bake right before serving.
- Customizable: Choose your favorite apple variety and spice level.
- Impressive Without the Effort: Looks gourmet but is beginner-friendly.
You’ll want to make this more than once—it’s just that good!
Essential Tools and Equipment
Before diving into the kitchen, gather these basic tools:
- Baking dish or casserole pan
- Melon baller or apple corer (for hollowing the apples)
- Mixing bowls
- Hand mixer or whisk
- Measuring cups and spoons
- Small spoon or spatula (to fill the apples)
- Aluminum foil (to cover while baking)
Nothing too fancy—but having the right tools makes the job easier and cleaner!
Preparation Tips
Want to ace this recipe from the first try? These tips set you up for delicious success.
- Choose firm apples: Honeycrisp, Fuji, or Granny Smith hold up well while baking.
- Pre-soften cream cheese: Let it sit at room temperature for smoother blending.
- Don’t scoop too deep: Leave some apple flesh at the bottom to keep the filling inside.
- Use a muffin tin: It helps hold the apples upright while baking if you don’t have a snug dish.
- Make-ahead tip: Hollow the apples and mix the filling a day ahead. Store separately, then assemble before baking.
Planning ahead makes this treat even easier when you’re short on time—or just want to relax with dessert in the oven.
Ingredients List
Here’s what you’ll need to whip up this irresistible fall dessert:
- 4 large apples (Honeycrisp, Fuji, or Granny Smith)
- 8 oz cream cheese, softened to room temperature
- ¼ cup granulated sugar
- 1 tsp vanilla extract
- 1 egg
- ½ tsp ground cinnamon
- ¼ tsp ground nutmeg
- Pinch of salt
- 2–3 graham crackers, crushed (for topping, optional)
- Maple syrup or caramel sauce (optional drizzle)
Note: Want a little extra crunch? Add chopped pecans or walnuts to the filling—just a tablespoon or two will do.
Step-by-Step Directions
Follow these simple steps for perfect Cheesecake Stuffed Baked Apples:
- Preheat your oven to 350°F (175°C). Grease your baking dish lightly.
- Core the apples: Cut off the tops and use a melon baller or apple corer to scoop out the center, leaving about ½ inch at the bottom for stability.
- Prepare the filling: In a bowl, mix softened cream cheese, sugar, vanilla, egg, cinnamon, nutmeg, and salt until smooth and creamy.
- Fill the apples: Spoon the cheesecake filling into the hollowed apples, filling just below the top edge.
- Add toppings: Sprinkle crushed graham crackers over the filling for a subtle crunch. You can skip this step for a smooth top.
- Bake: Place apples in your dish and cover loosely with foil. Bake for 25–30 minutes. Remove foil and bake another 10-15 minutes, until apples are fork-tender and filling is set.
- Cool slightly: Let them rest for 10–15 minutes before serving. They’ll firm up—and the flavors will meld beautifully.
- Drizzle & serve: Drizzle with maple syrup, caramel sauce, or a dusting of powdered sugar. Enjoy warm!
Common Mistakes to Avoid
It’s easy to love this recipe—but a few common slip-ups could trip up your dessert.
- Over-scooping the apples: Don’t hollow too much or the filling will leak out or collapse.
- Using cold cream cheese: This makes the filling lumpy and hard to evenly mix.
- Overbaking: Apples should be tender, not mushy. Keep an eye on them after the 30-minute mark.
- Not tasting your apples: If your apples are very tart (like Granny Smith), consider adding a bit more sugar to the filling.
Avoid these easy errors, and your baked apples will be a showstopper every time!
Best Side Dishes
Looking for what to serve alongside your Cheesecake Stuffed Baked Apples? Here are a few cozy options for a complete dessert plate:
- Vanilla Scoop: A classic scoop of vanilla bean ice cream balances the warm apples perfectly.
- Hot Apple Cider: Sip on something warm and spicy while enjoying your dessert—it’s a double apple delight!
- Pecan Shortbread Cookies: Buttery cookies add crunch and a nutty finish to contrast the creamy filling.
- Spiced Chai Latte: The warm spices of chai echo the cinnamon and nutmeg in the apples. So cozy!
Now that’s a fall dessert spread everyone will love.
Expert Recipe Tips
Want to take your stuffed apples to the next level? These pro tips can help elevate your results.
- Apple Choices Matter: Sweet with a firm texture works best—Honeycrisp is a crowd favorite for a reason!
- Try flavored cream cheese: Pumpkin spice or cinnamon-flavored cream cheese adds a seasonal twist.
- Add texture: Stir mini chocolate chips, toasted nuts, or crushed toffee into the cheesecake filling.
- Go gluten-free: Skip the graham topping or use a gluten-free alternative.
- Presentation tip: Serve in individual ramekins for a stunning dessert everyone gets to unwrap.
A few creative touches = an unforgettable dessert.
Storage and Reheating Instructions
Here’s how to keep leftovers tasting as good as Day 1:
- Refrigerate: Store cooled stuffed apples in an airtight container in the fridge for up to 3 days.
- Reheat: Place in a 300°F oven for 10–15 minutes or microwave for 30 seconds to 1 minute. Cover loosely with foil to retain moisture.
- Avoid freezing: The texture of the cheesecake filling can become grainy when frozen and reheated.
Want to prep ahead? You can prep apples and filling separately, refrigerate overnight, then assemble and bake fresh.
Frequently Asked Questions (FAQs)
Can I make these apples dairy-free?
Yes! Use dairy-free cream cheese and skip the egg or use a plant-based egg substitute like a flax “egg.” They still come out rich and delicious.
What’s the best apple to use?
Firm, sweet apples are ideal. Honeycrisp and Fuji hold their shape and add just the right sweetness. If you prefer more tartness, try Granny Smith—but consider adding more sweetener to the filling.
Can I make these in an air fryer?
Absolutely! Place the filled apples in a snug baking dish that fits your air fryer. Cook at 325°F for about 20 minutes, checking frequently for doneness.
Do I need to peel the apples first?
Nope! The skin helps hold everything together during baking. However, if preferred, you can peel the top inch or two for a softer bite.
Can I double the recipe?
Yes! Just use a larger baking dish and ensure apples have enough room to sit upright. You may need to add a few extra minutes to the baking time.
Final Thoughts
There’s something special about the smell of spiced apples baking in the oven, especially when paired with the creamy surprise of cheesecake inside. These Cheesecake Stuffed Baked Apples are more than just a dessert—they’re a warm, comforting hug in food form.
Whether you’re whipping these up for a fall dinner party, holiday gathering, or just a cozy night in, this recipe is sure to please. It’s simple, satisfying, and just indulgent enough to feel like a treat without the hassle of a full cheesecake.
So go ahead—give this cozy dessert a try! If you make it, drop a comment below or tag your creations on social media. I’d love to see how they turn out!
Looking for more fall dessert inspiration? Check out these other cozy recipes:
Happy baking and stay warm! 🍎🍁