
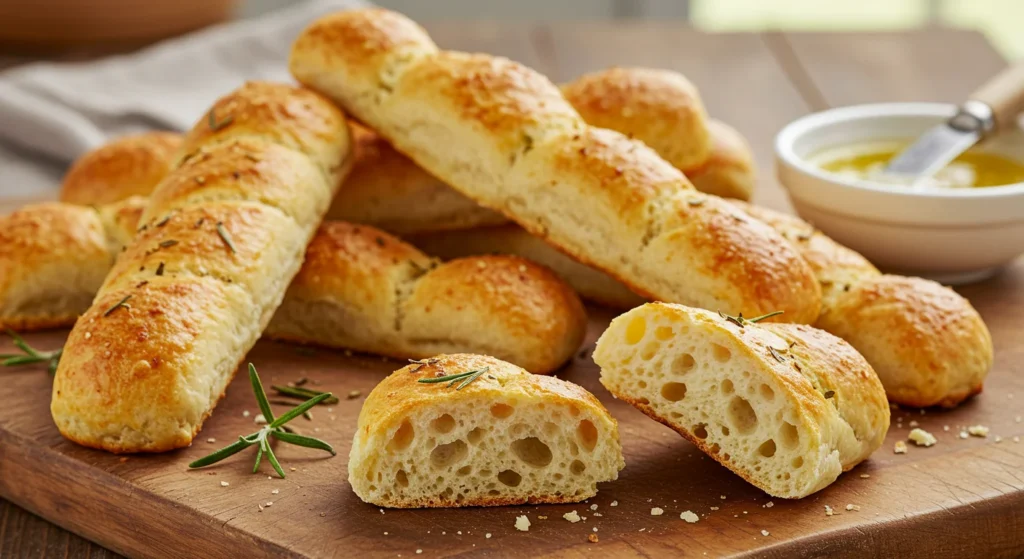
Easy Homemade Breadsticks Recipe – Perfect for Any Meal
Why You’ll Love This Recipe
There’s something undeniably comforting about warm, fresh-from-the-oven breadsticks—especially when they’re soft on the inside, golden on the outside, and brushed with melted butter and garlic. This Easy Homemade Breadsticks recipe ticks all the boxes: it’s quick to make, incredibly satisfying, and pairs with just about anything. Whether you’re planning a cozy family dinner or need a crowd-pleaser for a potluck, these breadsticks are a winner.
Here’s why you’re about to fall in love with this recipe:
- Simplicity: Made with pantry staples, the dough comes together easily—even if you’re a beginner baker.
- Flavor-packed: These breadsticks are infused with buttery, garlicky goodness and can be customized with herbs or cheese for extra flair.
- Quick Prep: With a short rise time, they’re oven-ready in under 45 minutes.
- Versatile: Serve them alongside soups, salads, pastas, or as a snack on their own.
- Kid-friendly: Soft, flavorful, and fun to dip—what’s not to love?
Breadsticks this good tend to disappear fast, so you might want to double the batch!
Essential Tools and Equipment
Before you start mixing and kneading, make sure your kitchen is armed with the right tools. Here’s what you’ll need:
- Large mixing bowl – for combining the dough ingredients.
- Measuring cups and spoons – precision matters!
- Whisk – great for distributing yeast and sugar evenly in water.
- Wooden spoon or dough hook – needed for mixing the dough.
- Clean dish towel or plastic wrap – to cover the dough as it rises.
- Rolling pin (optional) – helps shape the breadsticks evenly, though you can do it by hand.
- Baking sheet – the stage for your delicious creation.
- Pastry brush – perfect for brushing on that glorious butter and garlic mix.
No need for a stand mixer—though it helps, this dough is friendly to even the most basic kitchen setup.
Preparation Tips
Want consistently soft and bakery-quality breadsticks? Here are a few insider tips:
- Use warm water (but not hot): Ideally between 105°F and 115°F. Too hot and you might kill the yeast; too cold and it won’t activate properly.
- Let the dough rise in a warm, draft-free area: A slightly warm oven (turned off) with the door ajar works perfectly.
- Don’t over-flour: The dough should be slightly sticky. Adding too much flour can lead to dense breadsticks.
- Advance prepping: You can prepare the dough a few hours ahead. After the first rise, shape them and store covered in the fridge. Bake when ready.
A little planning goes a long way—and the smell of fresh bread wafting through your kitchen is always worth it.
Ingredients List
Here’s everything you’ll need to bring your homemade breadsticks to life:
- 1 cup warm water (105°F to 115°F)
- 2 1/4 tsp active dry yeast (or 1 packet)
- 1 tbsp granulated sugar
- 2 tbsp olive oil
- 1 tsp salt
- 2 1/2 cups all-purpose flour (plus a little extra for dusting)
- 3 tbsp unsalted butter, melted
- 1/2 tsp garlic powder
- 1/2 tsp dried parsley (optional garnish)
- Grated Parmesan cheese (optional, for topping)
Tip: Always have your ingredients at room temperature unless otherwise noted.
Substitute with bread flour if you want a chewier, more elastic texture.
Step-by-Step Directions
Let’s bring the dough to life and shape your soft, pillowy breadsticks:
- In a large bowl, whisk together warm water, yeast, and sugar. Let it sit for about 5 minutes, until frothy. This activates the yeast.
- Add olive oil and salt. Stir to combine.
- Gradually add flour, one cup at a time, mixing with a wooden spoon or dough hook until a soft dough forms.
- Turn the dough onto a floured surface. Knead for about 5–6 minutes, or until smooth and elastic. Dough should be slightly sticky but not unmanageable.
- Place the dough back in a lightly greased bowl. Cover with a clean towel or plastic wrap. Let it rise in a warm place for 30–45 minutes, or until doubled in size.
- Preheat oven to 400°F (200°C). Line a baking sheet with parchment paper.
- Punch down the dough and divide it into 12 equal pieces. Roll each into a rope about 6–8 inches long and lay them on the prepared baking sheet.
- Brush the breadsticks with half the melted butter. Bake for 12–15 minutes or until golden brown.
- Remove from the oven and brush immediately with the remaining melted butter mixed with garlic powder and parsley.
- Sprinkle with Parmesan if desired. Serve warm and enjoy!
Breadsticks should be soft and golden, with a slight crisp on the edges. They’re irresistible straight from the oven!
Common Mistakes to Avoid
Even simple recipes have their pitfalls. Here’s how to steer clear of the most common breadstick blunders:
- Using water that’s too hot: This can kill the yeast before it has a chance to rise. Always check the temperature if you’re unsure.
- Skipping the rise time: Rushing this step can lead to dense, heavy sticks. Be patient and allow them to double in size!
- Adding too much flour: Flour is your friend—but in moderation. Too much can dry out the dough.
- Overbaking: Breadsticks should be just golden. Watch them closely after the 12-minute mark.
Mistakes happen to the best of us—just learn, adjust, and try again!
Best Side Dishes
Wondering what to serve with these buttery beauties? Here are some winning pairings:
- Classic Spaghetti or Lasagna: A natural fit. Great for soaking up sauces and balancing richness.
- Tomato Basil Soup: Think of these as an upgrade to grilled cheese sandwiches.
- Caesar Salad: Croutons, step aside. These breadsticks bring crunch and softness all in one.
- Garlic Mashed Potatoes and Grilled Chicken: For a hearty, comforting meal with rustic vibes.
From Italian nights to summer BBQs, there’s no wrong way to enjoy them.
Expert Recipe Tips
Want to go from good to bakery-level great? These tricks will take you there:
- Add cheese to the dough: Mix in shredded mozzarella or Parmesan before rolling for cheesy breadsticks!
- Infuse the butter: Melt butter with a fresh garlic clove and a pinch of herbs, then strain and brush for deep flavor.
- Make it spicy: Add a pinch of red pepper flakes to the dough or butter mixture for a kick.
- Double and freeze: Shape extra dough into sticks and freeze unbaked. Bake from frozen—just add a few minutes to the cook time.
The best part about breadsticks? They’re a blank canvas waiting for your creativity.
Storage and Reheating Instructions
Got leftovers? (Though it’s rare!) Keep them fresh and tasty with these tips:
- Storage: Store cooled breadsticks in an airtight container at room temperature for up to 2 days. For longer storage, refrigerate up to 5 days.
- Freezing: Freeze baked breadsticks in a sealed freezer bag for up to 2 months. Wrap in foil to prevent freezer burn.
- Reheating: Wrap in foil and place in a 350°F oven for 8–10 minutes or until warm. You can also zap in the microwave for a quick fix, though the texture may soften a bit.
Pro tip: Reheat with a dab of butter on top for that just-baked shine and softness.
Frequently Asked Questions (FAQs)
Can I use instant yeast instead of active dry yeast?
Yes! Just skip the proofing step and mix the instant yeast directly with the dry ingredients. The rise time will be slightly faster.
How do I make gluten-free breadsticks?
You can substitute with a 1:1 gluten-free all-purpose flour blend. Texture may vary slightly, so check the dough for consistency and adjust as needed.
Can I add toppings before baking?
Absolutely! Sprinkle sesame seeds, poppy seeds, or coarse salt before putting them in the oven. Cheese lovers—this is your moment.
What’s the best flour to use?
All-purpose flour works perfectly, but bread flour gives a chewier texture. It’s great if you’re looking for a more bakery-like result.
Can I make the dough in a stand mixer?
Sure! Use the dough hook attachment to mix and knead the dough. It saves time and effort.
Final Thoughts
Homemade breadsticks are one of life’s simple joys. They’re quick to make, easy to customize, and bring that warm, welcoming touch to any table. Whether you’re serving them with dinner, dipping them into your favorite soup, or sneaking one as a snack—you’ll find this recipe becomes a staple in your kitchen.
So the next time you’re craving something warm and savory, skip the pre-packaged variety and whip up a batch of these Easy Homemade Breadsticks. You’re only a handful of ingredients and a short rise away from golden, garlicky goodness!
Have you tried this recipe? Let me know how it turned out in the comments below—or share your favorite twist on traditional breadsticks. And if you loved it, consider sharing with a fellow bread-lover!
Happy baking! 🍞🥖
—
Looking for more cozy baking recipes? Check out our other favorites: