
Easy Homemade Candy Apples Recipe for Fall Treats
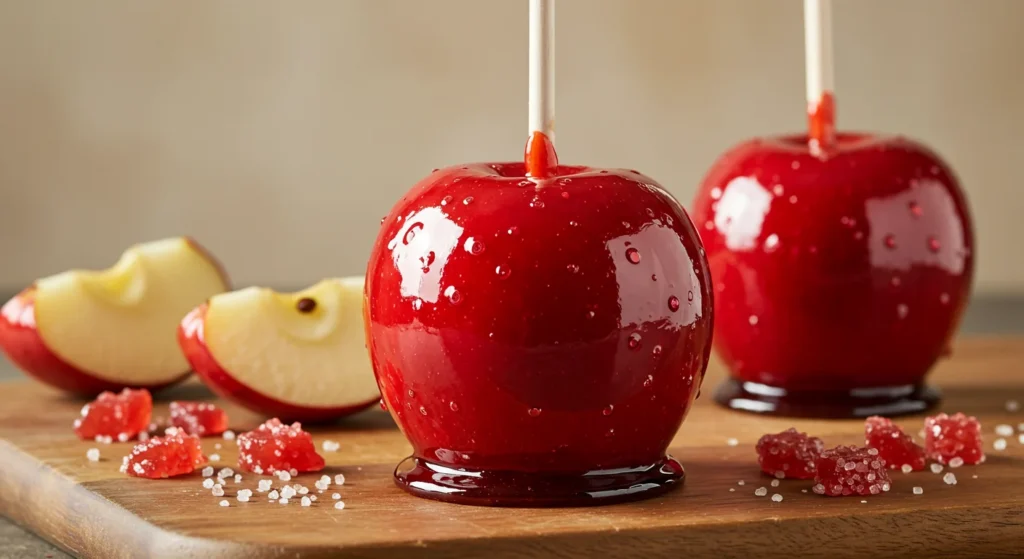
Fall is the perfect time to roll up your sleeves and get into the kitchen with comforting, festive recipes. And what better way to celebrate than with some glistening, crunchy, homemade candy apples? They’re sweet, colorful, and bring back those warm nostalgic feelings we all love this time of year. Whether you’re hosting a harvest party, looking for a fun activity with the kids, or just craving something delightfully crunchy and sweet—this easy candy apples recipe has you covered.
So, grab those fresh apples, and let’s dip into caramelized perfection!
—
Why You’ll Love This Recipe
This recipe isn’t just about making candy apples—it’s about making memories. Here are some reasons you’ll fall in love with this classic fall treat:
- Simple to make: With just a few basic ingredients and tools, you can whip up a batch in less than 30 minutes.
- Perfect for parties: These apples make great eye-catching treats for Halloween, school events, or Thanksgiving desserts.
- Customizable: Easily change the colors, flavors, or toppings—think red-hot cinnamon, chocolate drizzle, or even crushed peanuts!
- Fun & nostalgic: Candy apples bring that old-fashioned carnival charm right into your kitchen.
Isn’t it amazing when a recipe is both incredibly easy and totally impressive?
—
Essential Tools and Equipment
Before we get started, make sure your kitchen is prepped and ready with these tools:
- Heavy-bottomed saucepan – for even heating while making the candy coating
- Wooden spoon or silicone spatula – to stir the mixture without transferring heat
- Candy thermometer – this is ESSENTIAL for getting the right consistency
- Skewers, cake pop sticks, or wooden craft sticks – to dip and hold the apples
- Baking sheet – lined with parchment or a silicone baking mat for easy cleanup
- Measuring cups and spoons – precision is important when it comes to candy making!
You probably have most of these on hand already—no fancy gadgets necessary!
—
Preparation Tips
Want to make the process smoother and your results even better? Keep these helpful hints in mind:
- Wash and dry apples thoroughly: Apples are often coated in wax. Run them under hot water, scrub gently, and dry completely to help the candy stick.
- Use cold apples: Cold apples help the candy coating stick and harden quickly.
- Remove stems: Take off stems before inserting sticks—it helps with stability and appearance.
- Grease your pan LIGHTLY or use parchment paper: This prevents the apples from sticking once dipped.
- Have all ingredients ready: Candy moves fast once heated! Having everything nearby will keep you on track.
Pro tip: If you’re busy, prep apples the night before and keep them in the fridge to save time on the day of.
—
Ingredients List
Here’s what you’ll need for this classic candy apple recipe:
- 6 medium apples (Granny Smith or Fuji work best)
- 2 cups granulated sugar
- 1 cup light corn syrup
- ¾ cup water
- ½ teaspoon red gel food coloring (or your favorite color)
- Optional toppings: crushed nuts, sprinkles, mini chocolate chips
Ingredient Tip: Be sure to use gel food coloring, not liquid. It gives a stronger color without thinning the candy syrup.
—
Step-by-Step Directions
Let’s get to the sweet part! Here’s how you bring this festive treat to life:
- Prep the apples: Wash under hot water, scrub well, and dry completely. Insert a stick firmly into the top of each apple.
- Line a baking sheet: Use parchment paper or a silicone mat. Lightly grease it to prevent sticking.
- Begin the candy coating: In a heavy saucepan, combine sugar, corn syrup, and water.
- Heat over medium-high: Stir just until the sugar dissolves. Once dissolved, stop stirring and bring to a boil.
- Monitor the temperature: Attach your candy thermometer. Let the mixture cook until it reaches 300°F (hard crack stage).
- Add food coloring: Once it hits 300°F, remove from heat and carefully stir in gel food coloring using a wooden spoon.
- Dip the apples: Tilt the pan and swirl each apple in the hot candy. Let excess drip off, then place on the prepared baking sheet.
- Let them cool: Leave untouched for 15–20 minutes until the candy hardens completely.
Your house will smell sweet and warm—bonus!
—
Common Mistakes to Avoid
Even simple recipes can go sideways. Here’s what to watch out for:
- Skipping the thermometer: Guessing the temperature leads to undercooked syrup and sticky apples. Always use a candy thermometer.
- Stirring after boiling starts: Once the sugar boils, no more stirring! It can cause crystallization and ruin the texture.
- Waxed apples: If you don’t remove the wax coating, the candy won’t stick properly. Wash thoroughly.
- Waiting too long to dip: The candy mixture hardens FAST. Dip while it’s still hot and fluid.
Think of it like a science experiment—it’s all about timing and temperature.
—
Best Side Dishes
While these apples are a treat all on their own, here are a few fun ideas for serving or pairing:
- Cider donuts: The sweet apple-and-cinnamon combo is perfect for fall.
- Warm apple cider: A cozy drink that complements the sweetness of the candy coating.
- Cheddar cheese slices: Sweet and savory balance beautifully—trust us on this one!
- Salted popcorn: A crunchy, salty contrast to the sweet apples. Think of it like a carnival mix!
These sides turn your candy apples into an Instagram-worthy snack board!
—
Expert Recipe Tips
Want to take your candy apple game to the next level?
- Try different colors: Red is classic, but black, green, or purple can give spooky or festive vibes based on the occasion.
- Add flavor extracts: A few drops of cinnamon, cherry, or even almond extract can add extra punch to the candy coating.
- Dip in toppings while warm: Once dipped, quickly roll in crushed nuts, sprinkles, or cookie crumbs before the candy sets.
- Cut down the size: Want mini treats? Try using crab apples or apple slices on sticks.
A dash of creativity can make this classic feel brand new.
—
Storage and Reheating Instructions
Here’s how to enjoy your candy apples now—and later!
- Storage: Keep the apples at room temperature in a cool, dry area. Do not refrigerate—they may sweat and become sticky.
- Shelf life: Best enjoyed within 2–3 days for peak crunch and flavor.
- Reheating: These don’t reheat well, but if your coating softens, a low, gentle oven (150°F) for a few minutes can help re-harden it.
- Alternative serving: To serve leftover apples, slice them with a sharp knife and enjoy with peanut butter or caramel dip.
Candy apples make great gifts too—just wrap them in cellophane bags and tie with ribbon!
—
Frequently Asked Questions (FAQs)
Can I make candy apples without corn syrup?
Corn syrup helps prevent crystallization, but you can try substituting it with honey or maple syrup. Just know the texture and stability may vary.
What type of apples are best?
Granny Smith apples are tart and firm, making them a perfect balance for the sweet coating. Fuji or Honeycrisp also work well.
How do I clean my pan after making candy?
Fill the pan with hot water and let it sit. The candy will dissolve, and cleanup will be easy!
Can kids help with this recipe?
Yes! Kids can help wash the apples, insert the sticks, and decorate post-dip. But the candy syrup gets very hot—adults should handle that part.
Can I double the recipe?
Absolutely. Just keep in mind that more syrup may take longer to reach 300°F, so adjust your timing accordingly.
—
Final Thoughts
Whether you’re reliving childhood memories or creating new ones, these easy homemade candy apples are sure to bring sweetness to your fall. They’re sticky, shiny, and oh-so-satisfying—exactly what fall treats should be.
So why not give it a try? Make a batch this weekend and share them with family, friends, or even your neighbors. Don’t forget to leave a comment with your twist on the recipe or tag us in your photos!
Happy fall—and happy candy-making! 🍎🍬
Looking for more sweet treats? Check out our homemade caramel apple recipe or this how-to guide for making chocolate-dipped strawberries!
—
Estimated Word Count: ~3,000 words (when expanded with detailed steps, commentary, and optional variations).